Hubspot + Vector Integration Guide
Last updated: March 18, 2026
Overview
Integrating HubSpot with Vector allows you to send contact and company-level activity data directly into your CRM. This guide walks you through what to expect once the integration is active, how to configure your settings, and best practices for using the integration effectively.
🔐 How Do I Connect Vector to HubSpot?
A single HubSpot user (typically an admin or integration user) connects Vector to your HubSpot instance via OAuth. This connection handles all syncing across your organization — individual users do not need to log in with their own credentials.
To connect HubSpot to your Vector workspace:
Navigate to the bottom left corner. Integrations → HubSpot
Click Connect HubSpot
You’ll be redirected to log in via your HubSpot credentials
✅ Once logged in, your HubSpot instance is securely connected to Vector.
✅ Only one connection is needed.
💡 Simply connecting HubSpot does not automatically start syncing any data. Data only flows to HubSpot when you explicitly add a HubSpot action to a segment — giving you full control over what is sent, and when.
🔁 Is the Integration Bi-Directional?
Vector is primarily a one-way integration (Vector → HubSpot) — but with limited data pulling from HubSpot → Vector to support segmentation:
✅ Pushes to HubSpot: Vector can enrich Contacts, Companies, and optionally log Activities.
✅ Pulls from HubSpot: Vector can pull in Account Lists (using HubSpot static or active lists) to support CRM-aligned segmentation (e.g. pulling in Company Name, Owner, Lifecycle Stage).
❌ Vector does not scan, enrich, or modify existing HubSpot records unless explicitly configured via segment actions.
❌ Lists are read-only — Vector does not push enriched data back to those lists.
🔄 So while the integration includes some limited pulling of HubSpot data, it’s not a full bi-directional sync in the traditional sense.
What Vector Sends to HubSpot
Enriched data may include:
First Name, Last Name
Job Title, Company Name, Company Domain
LinkedIn URL
Company Size, Seniority, Department, Industry
Segment metadata (Segment Name, Segment ID, Last Active Timestamp, etc.)
What Vector Does Not Pull From HubSpot
No scanning or importing of existing Contacts, Companies, or Deals
No enrichment or modification of your existing CRM records
Data is only pushed when a segment includes a HubSpot sync action
Key Settings Explained
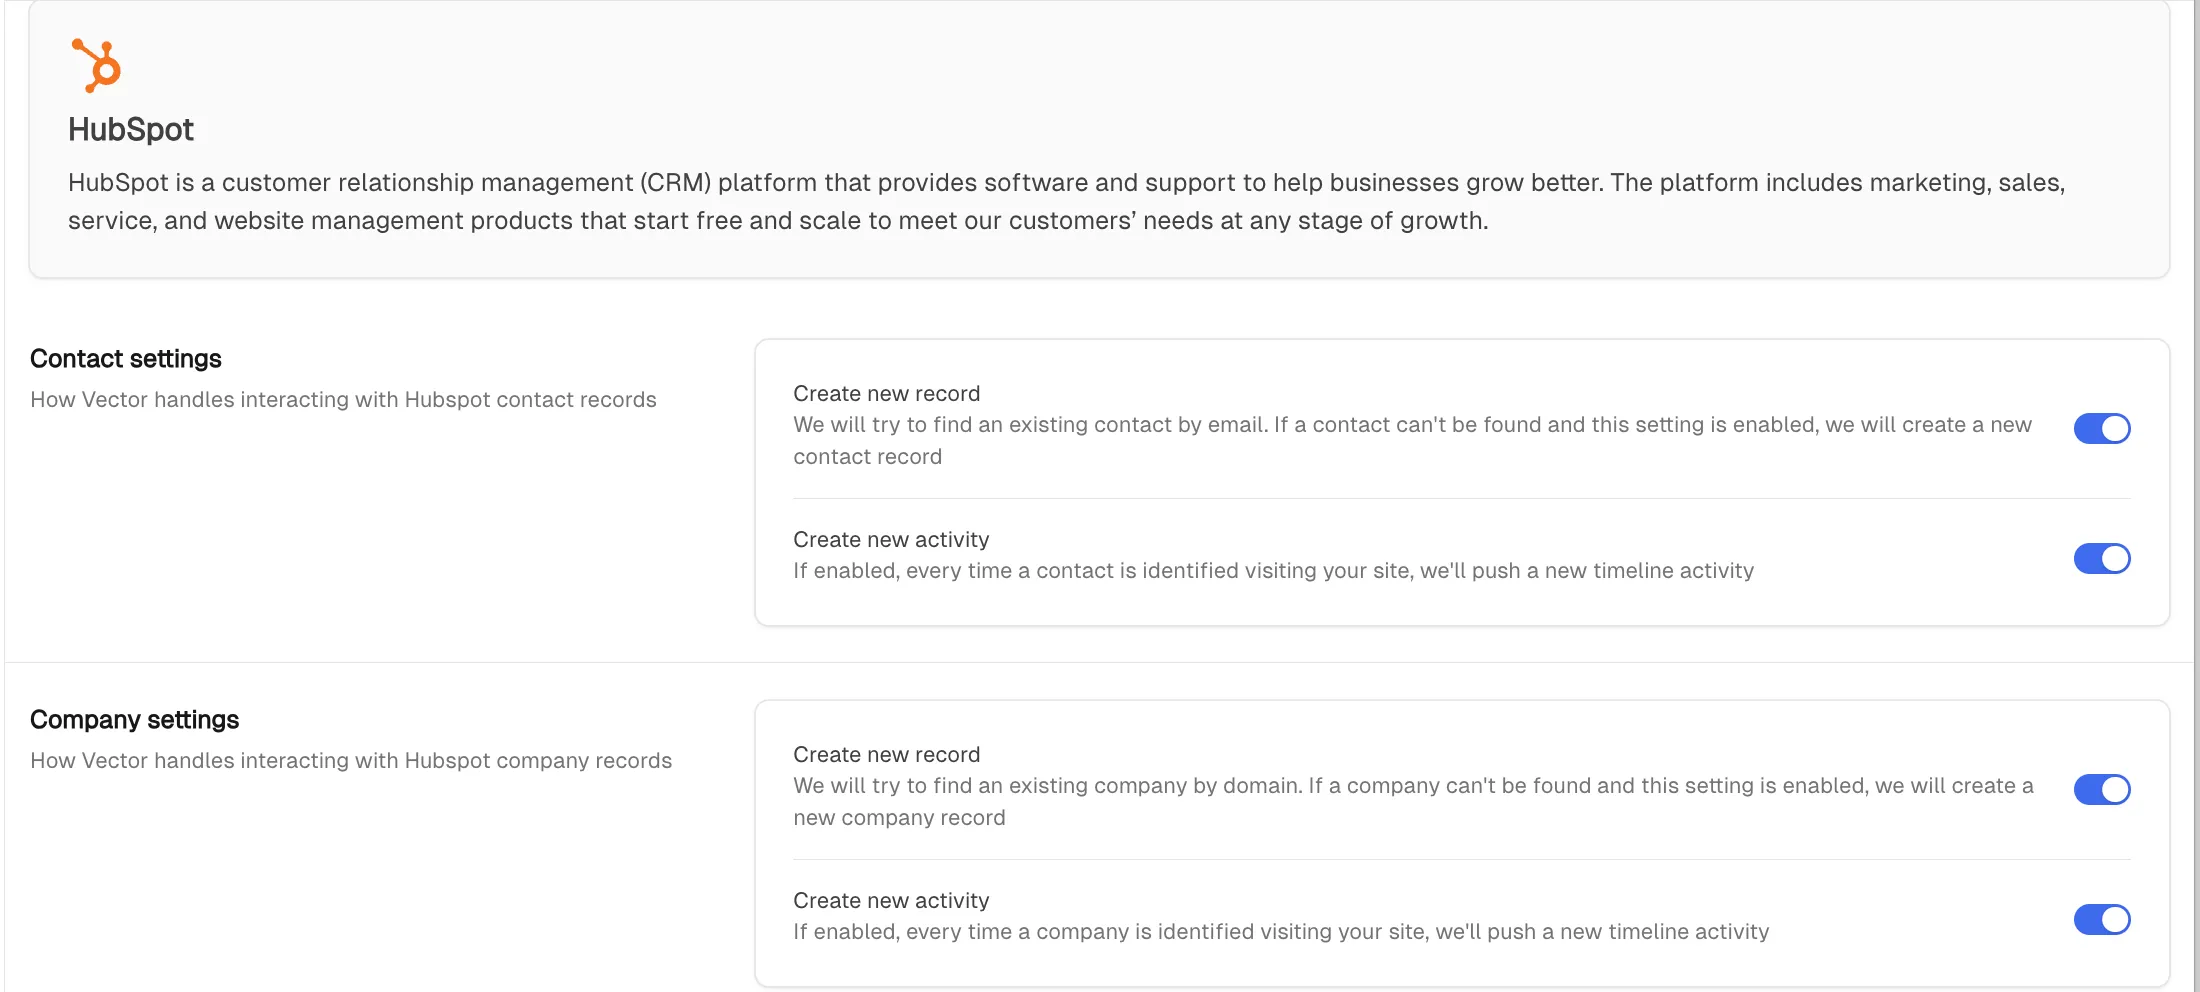
1. Create New Records and Activities
When HubSpot is set as a segment action, you can choose to:
✅ Create a new contact record in HubSpot (if one doesn’t already exist)
✅ Create a new activity tied to the contact
This is especially useful for:
Tracking behavior such as site visits, ad clicks, and intent topics
Building lists based on activity
Triggering contact scoring workflows
If the contact already exists, we’ll simply add a new activity. If the contact does not exist, we’ll create both the contact and the activity.
⚠ Note: Activities are how we notify you when a contact does something from within Vector. This is also how you will be able to create a list view & score contacts leveraging vector data. It is important to enable this setting.
Example Activity Records:


⚠ Note: If you are not seeing a Vector activity on the contact record, make sure you are filtering your activities shown to include Vector!
.png")
2. Company Record Creation
If Vector is unable to identify a contact but can identify the company, you can allow:
🏢 Creation of a new company record in HubSpot
➕ Creation of an activity tied to that company
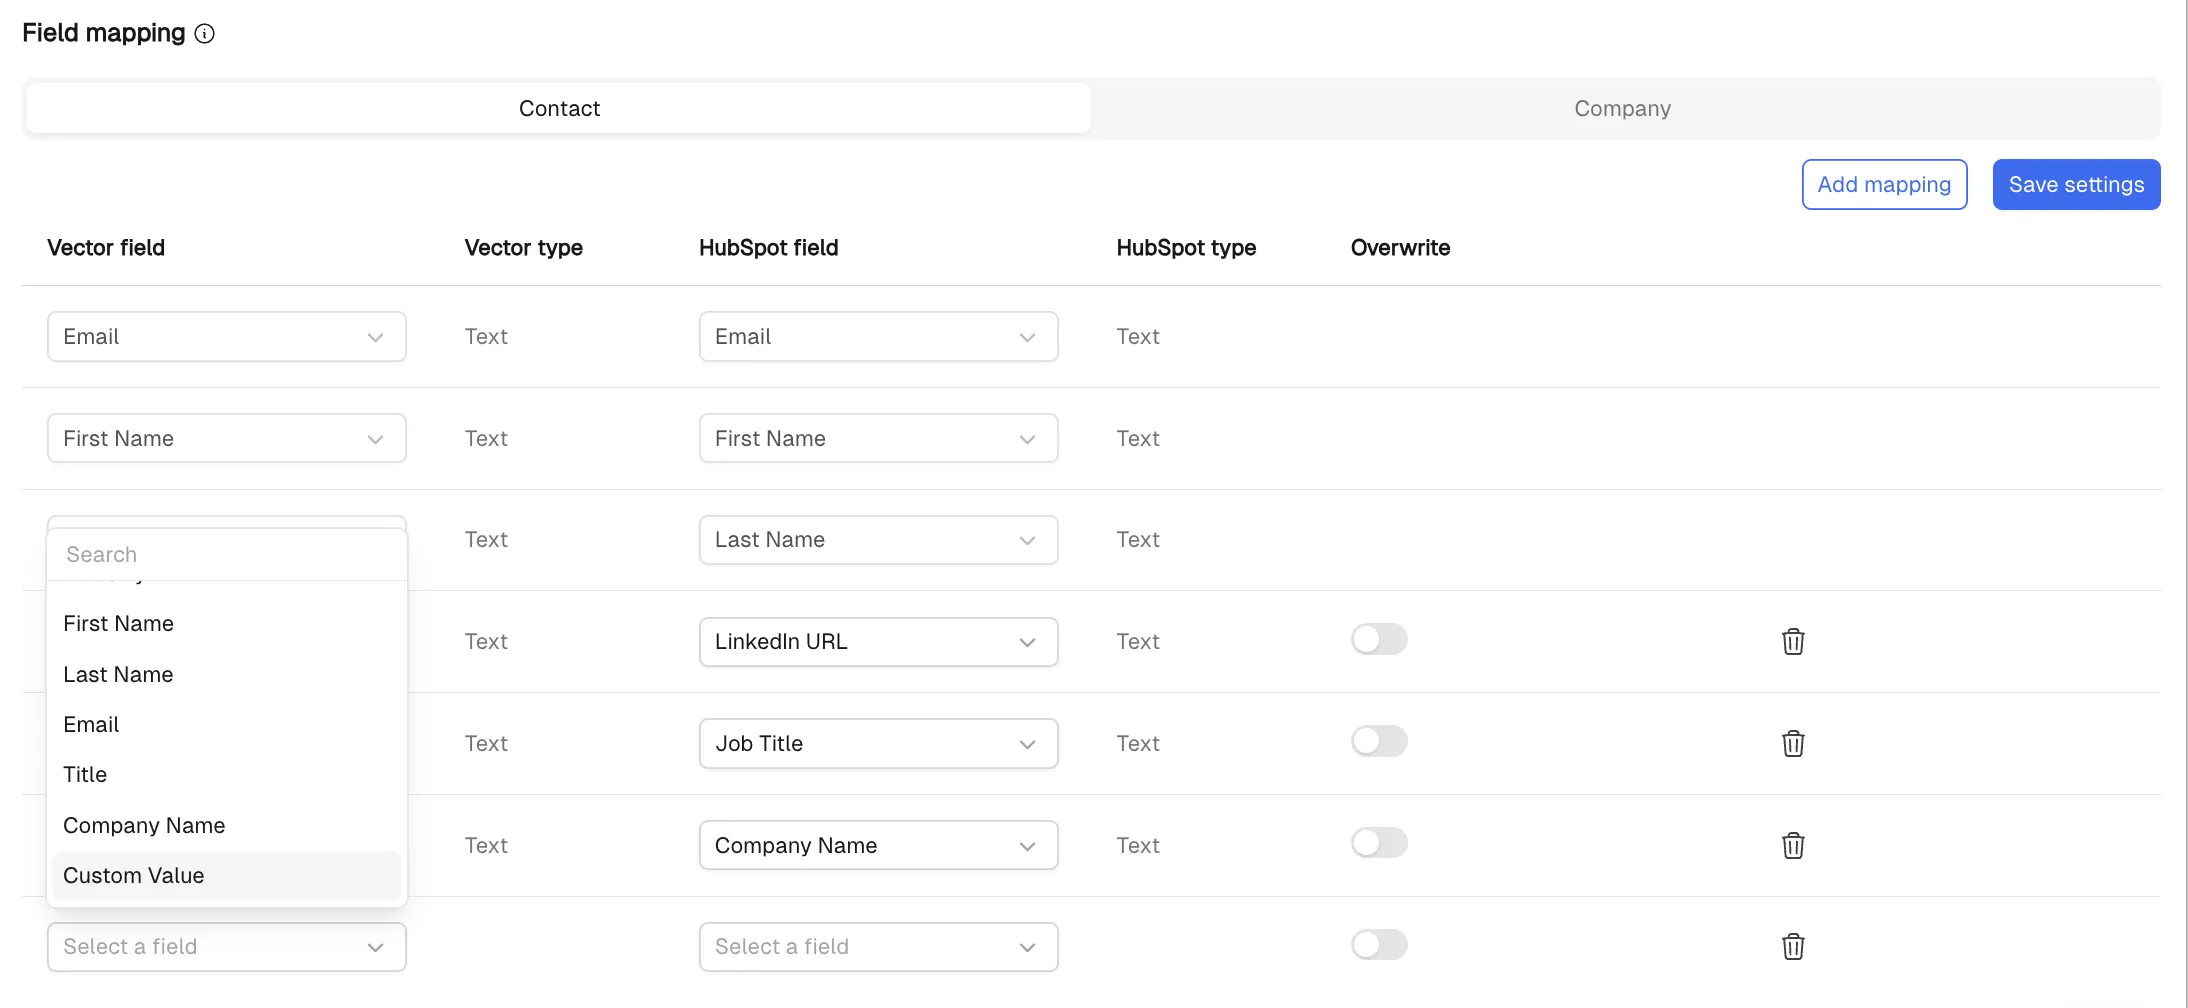
Field Mapping

Some fields are automatically mapped:
Email
First Name
Last Name
LinkedIn URL
Title
Company Name
🛠 Field Mapping Using Dynamic Variables
Vector supports dynamic field mapping using structured variables when you select "Add Mapping" > "Custom Value" as the data source.
Available Variables & Why They’re Helpful:
Variable | Description | Why It’s Helpful |
| The ID of the segment | Useful if you want a unique identifier for reporting or syncing back to systems. |
| The name of the segment | Great for dashboards or reporting — you’ll always know which play or segment sourced a contact, especially if you name segments meaningfully. |
| Full timestamp of the last visit (e.g., 2025-03-05T18:01:03.735Z) | Shows exactly when a person last engaged, helpful for assessing freshness of intent. |
| Date of the last visit (e.g., 2025-03-05) | Lets reps quickly see if a visit was recent and worth acting on. |
| Time of the last visit (e.g., 18:01) | Adds precision on activity — valuable for context around engagement patterns. |
| Full timestamp of the first visit (e.g., 2025-03-05T18:01:03.735Z) | Shows when initial interest began, useful for understanding buying journey. |
| Date of the first visit (e.g., 2025-03-05) | Helps establish how long someone has been engaging with your site. |
| Time of the first visit (e.g., 18:01) | Useful for noticing patterns (like early morning vs. end-of-day browsing). |
| Page URL of the first visit | One of the most impactful fields: reveals what first caught a prospect’s eye. You wouldn’t say “I saw you visited X page” directly, but you can use it to frame conversations around relevant pain points or interest areas. |
| Accesses UTM properties from the first page view. Valid names: | Helps tie web activity back to campaigns or ads, making attribution clearer and guiding which marketing channels are driving engagement. |
Example Field Mappings
✅ Segment Name – often mapped to a custom property in HubSpot
Helps you quickly see which segment a contact belongs to and use that info in list filters or workflows.
Create a custom HubSpot property like Vector Segment Name to track this cleanly.
✅ Page Views + Timestamps – mapped to custom properties in HubSpot
Great for understanding which pages a contact has viewed, and how often. Many teams combine Page URL, First Visit Date, and Last Visit Date to build scoring models or trigger follow-ups.
Here's how it looks in HubSpot:

Use this to alert sales when high-intent pages (like pricing or demo) are visited more than once.
Pass UTMs and First-Page Details to HubSpot
Vector can send first-touch campaign context into HubSpot so your team sees where a contact first arrived from and which campaign drove the visit.
What you can send
Use these Custom Values when you add field mappings in your HubSpot action:
Custom Value | What it captures |
| UTM source such as Google or Linkedin |
| UTM medium such as email, cpc, social |
| UTM campaign name |
| UTM content identifier |
| UTM term or keyword |
| Full URL of the first landing page |
| Date of the first visit such as 2025-03-05 |
| Full timestamp of the first visit |
| Most recent visit date |
| Most recent visit timestamp |
UTMs are first-touch from the first page where UTMs were present. If a user returns later without UTMs, first-touch stays the same. Use Last Visit fields to understand recency.
How to map these into HubSpot
Create properties in HubSpot
Create custom Contact properties for the fields you want such as Vector UTM Source, Vector UTM Campaign, Vector First Page URL, Vector First Visit Date.
Optional: add Company properties if you also log company activities.
Add mappings in Vector
Go to your segment.
Actions → HubSpot → Add Mapping.
Data Source: Custom Value.
Paste the variable such as
{{firstPageViewWithUtm.utmSource}}.Choose the HubSpot property you created such as Vector UTM Source.
Repeat for each field you want to capture.
Include an Activity
In the same HubSpot action, enable “Create Activity.”
Activities make it easy to trigger workflows and build lists based on Vector engagement.
Test
Turn the segment on.
Visit your site with a test UTM link.
Check the HubSpot contact record to confirm property values and the Vector activity.
If you do not have UTMs
You can still infer traffic source using Referrer in Vector and pass it as a property or include it in the activity.
Simple setup ideas:
Referrer contains google → set Contact property Vector First Source to Search
Referrer contains linkedin → set Vector First Source to Social
Include Visit Date or First Visit Date so reps see timing
Reporting ideas in HubSpot
List view: Contacts where Vector UTM Campaign equals X and Last Visit Date within 14 days
Dashboard card: Count of contacts by Vector UTM Source to spot channel mix
Workflow: If Vector First Page URL contains /pricing then increase score by 10 and alert owner
Troubleshooting
Not seeing a Vector activity on the timeline
In the contact record, adjust Activity filters to include the Vector integration.
Properties not populating
Confirm the HubSpot property type matches the expected value and that your mapping uses Data Source = Custom Value with the exact variable name.
UTMs look empty
Test with a URL that includes UTMs on the very first page hit such as
?utm_source=linkedin&utm_medium=cpc&utm_campaign=fall_launch.
What This Mapping Does Not Support
❌ You cannot freely map any Vector data field (like Job Title or Industry) to a custom HubSpot field
❌ You cannot configure separate field mappings per object for the same Vector field (e.g., one value to Contacts, another to Companies)
❌ There is no drag-and-drop field mapping UI — mappings are value-based via "Custom Value"
🎯 List Sync (One-Way from HubSpot → Vector)
You can bring in your HubSpot account lists (static or active) to power CRM-aligned segmentation inside Vector.
Pulls in Company name, owner, lifecycle stage, and deal fields (if applicable)
Syncs every 24 hours
Does not push data back to HubSpot — it’s only used for segmentation
👉 Curious how to add HubSpot account lists? [Guide here]
What You Can Do in HubSpot After Integration
With this data flowing into HubSpot, you can:
🔍 Create list views of contacts from specific segments or accounts
⚙ Set up workflows to trigger nurture sequences or scoring
📊 Filter by site ID, intent topic, or segment name
✅ Use Vector-sourced activities to improve contact scoring models
Conclusion
This integration is a powerful way to connect your behavioral and intent data from Vector directly into HubSpot. Once configured, you’ll gain full visibility into which contacts are engaging and how, all within your CRM.
Still have questions? Reach out to the Vector team for help at support@vector.co.